



 Русский (RU)
 Українська (UK)
 Türkçe (TR)
 Italiano (IT)
 Français (FR)
 Português (PT)
 中文 (中国) (ZH)
 Español (ES)
 日本語 (JA)
 ไทย (TH)
 Deutsch (DE)
 Ελληνικά (EL)
 Polski (PL)
 Bahasa Indonesia (ID)
 Nederlands (NL)
 العربية (AR)
 한국어 (KO)

Hayao Miyazaki, co-founder of Studio Ghibli and director of Spirited Away, has said animation is built one drawing at a time, never through sudden bursts of inspiration. That same patient mindset is exactly how to make an animation of your own, one frame at a time, until your idea starts to move.
To make an animation from scratch, you don’t need expensive software, a top-spec computer, or a powerful GPU. In fact, one of the biggest misconceptions beginners have is that learning how to make an animation starts with expensive software. It doesn’t. The most important skills, timing, observation, storytelling, and movement, can all be learned with nothing more than paper, a pencil, and patience.
In this guide, we’ll cover animation styles, pre-production planning, paper-based techniques, digital production, and sound and export steps that finish your film.
Let’s turn that idea into your first finished film.
Key Takeaways
- Animation is built from three core styles: 2D hand-drawn, stop motion, and 3D/CGI. Each demands different time, skill, and tools. Your choice shapes the rest of your workflow.
- Pre-production should include a locked script, character design sheets, and a storyboard of just eight to fifteen key panels, not a frame-by-frame breakdown of the whole story.
- Production can happen entirely on paper, using flipbooks or cut-out stop motion with just a pencil and camera, or digitally using free tools like Krita, Pencil2D, and Blender.
- Shooting “on twos” (twelve unique frames per second held for two frames each) is standard practice in traditional 2D animation. It saves significant production time without sacrificing smoothness.
- Post-production should include Foley and ambient sound layered in before exporting, since sound synced precisely to action frames is what makes footage feel believable.
- Finished films should be exported as MP4 files using the H.264 codec at 1080p resolution. Match your original frame rate to avoid choppy playback.
Understanding the Core Styles of Animation
Before you sketch a single frame, every animator has to choose a method of bringing an idea to life, and that choice shapes your tools, your timeline, and how much patience the project will demand.
Here are the three styles most beginner animators choose from.
- 2D Cel or Hand-Drawn Animation: Every frame is drawn by hand in this traditional method, the same craft behind classics like Spirited Away, where each individual drawing creates the illusion of movement. It demands more time than any other style, but it also gives you the most creative control over line, texture, and expression.
- Stop Motion: Rather than drawing each frame, you’re physically moving objects, like clay figures, paper cut-outs, or puppets. You then photograph every small change. This is the same technique used in films like Fantastic Mr. Fox. You’ll need a steady camera setup and a lot of patience, since even a few seconds of footage can take hundreds of individual shots.
- 3D or CGI Animation: Unlike the two methods above, nothing is physically drawn or moved by hand. Digital skeletons, rigging, and virtual cameras do the work instead. This is a core technique in modern game-engine pipelines like those used in Unreal Engine. You’re building and animating everything inside software rather than physically drawing or moving objects.
If you want to transition from admiring classic techniques to mastering the camera yourself, discover your creative voice at our Film & Animation Summer School.
Whether you eventually want to direct animated films, design game cinematics, or work in visual effects, these three approaches matter. Understanding them gives you the vocabulary every professional animator shares before specialising.
Film and Animation
In-person
Unleash your creativity in Tokyo, the vibrant heart...
Film Studies
In-person
Explore cinematic arts in London, a city that...
Pre-Production: Laying the Foundation for Your Project
Before you go on to animate or draw a single frame, you need to have several things prepared, from your story idea to your visual assets, or you’ll find yourself redrawing work you could have planned for from the start.
Here are the key steps to take before production begins.
Brainstorming and Scriptwriting
A strong animation starts with a script built for the medium, not a novel squeezed onto a page. Focus on these elements first, since they’ll shape every decision you make later in production.
- A clear, single-sentence premise: Write your idea down in one sentence before anything else, for example “A lonely robot tidies an abandoned city until it finds a single growing plant.” If you can’t summarise your idea this simply, it’s not ready for a script yet.
- One standout character trait: Give your main character one specific, visual trait the audience can recognise instantly, like a limp, a signature object, or a nervous habit. Complex backstory doesn’t translate to animation the way a clear physical or behavioural detail does, especially in a short film.
- A three-scene structure: Limit your first script to three scenes, a setup, a complication, and a resolution, rather than a full multi-act plot. Beginners who try to animate a ten-scene story usually abandon the project halfway through. Keeping scope tight is what actually gets a film finished.
- Minimal dialogue, maximum action: Write actions and reactions instead of long conversations. Animated dialogue is expensive in time and often unnecessary for short films. A well-animated glance or gesture can carry more weight than a paragraph of speech, and it’s far faster to produce.
- A locked location list: Decide on your settings before scripting scenes, and limit yourself to one or two environments for your first project. Every new location means new background art, so fewer settings means a faster path from script to finished film.
Designing Your Visual Assets
Once your script is locked, you need to design how your characters and world will actually look before you animate a single frame.
Start with a character turnaround sheet, drawing your character from the front, side, and three-quarter angle. Keep this on one page. Without this reference, proportions tend to shift from shot to shot in beginner work.
Lock a colour palette of no more than five or six shades, noting their exact hex or paint codes, so colours don’t drift between scenes. Sketch each location as a rough thumbnail showing key shapes rather than a full background. Detailed scenery takes far longer to animate around than a simple layout.
Finally, draw your character’s face in three or four key expressions, such as neutral, surprised, and upset, so expressions stay consistent throughout production.
How to Make an Animation Storyboard
You don’t need to sketch every individual movement for a storyboard, only the key narrative beats and transition points. A typical short animation needs just eight to fifteen panels, since sketching every single movement would take a very long time and slow down a process meant to move quickly.
Follow these steps to build yours.
- Divide your script into shots, not scenes: Break each scene into individual camera shots, such as a wide establishing shot followed by a close-up reaction. Most short animations need three to five shots per scene.
- Sketch stick-figure thumbnails, not finished art: Draw each shot as a rough thumbnail, roughly two by three inches, using simple shapes and stick figures. Finished linework at this stage only slows you down.
- Label camera angle and shot type on every panel: Note whether it’s a wide shot, close-up, or over-the-shoulder angle directly on or beside each thumbnail. This becomes your production reference later.
- Add one line of action per panel: Underneath each thumbnail, write a single sentence describing what happens, for example “Character notices the plant and freezes.” This keeps your storyboard functioning as a plan, not a finished piece.
- Number your panels in sequence: Number each thumbnail in the order it appears on screen, even if you draw them out of order. This makes shots easy to reorder later.
Join the Immerse Education 2025 Essay Competition
Follow the instructions to write and submit your best essay for a chance to be awarded a 100% scholarship.
Production Option A: How to Make an Animation with Paper
Paper animation remains one of the most accessible and affordable ways to bring your first idea to life, requiring nothing more than a pencil, some paper, and patience.
Here are the different techniques you can try, starting with the simplest.
1. Creating a Classic Flipbook
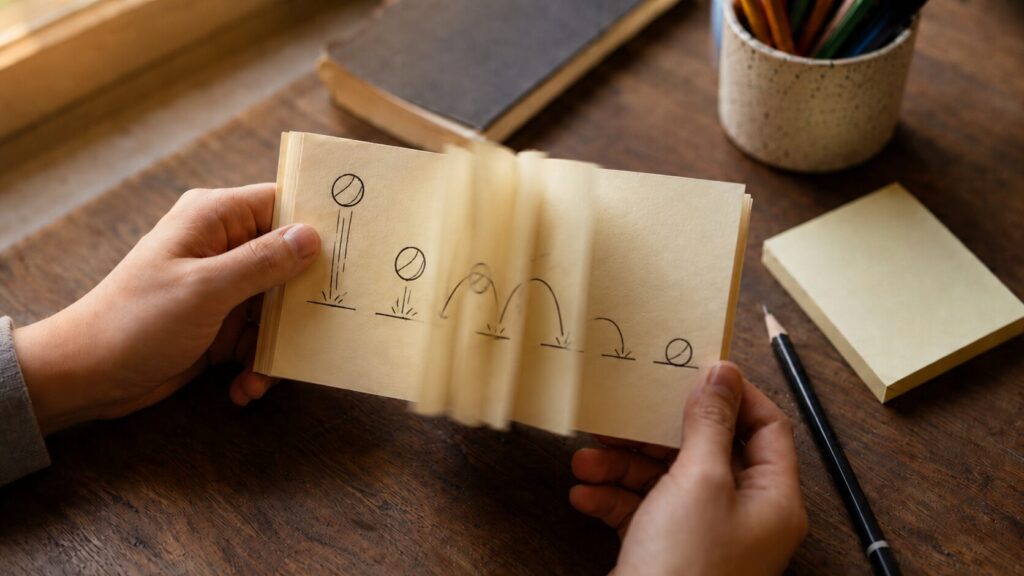
A flipbook is the simplest way to see your first animation move, and all you need is a sticky note pad, a pencil, and about fifteen to twenty pages to start.
Draw your first frame on the last page of the pad, not the front. Flipping relies on riffling from back to front. Starting at the front will play your sequence in reverse. Keep every drawing small and in the same corner of the page, ideally within a one-inch square, so the image doesn’t jump around when flipped.
Every few pages, bend the stack and riffle through what you’ve drawn so far, using the paper’s natural flex to catch awkward jumps before finishing the sequence. Move your subject only slightly between frames, shifting a bouncing ball two to three millimetres per page.
Aim for fifteen to twenty frames on your first attempt, enough to practise timing and spacing without overcommitting.
The Mechanics of Animating on Paper
Once you’re comfortable with basic flipbooks, a few technical habits will make your paper animation look noticeably smoother.
- Use a lightbox or a sunlit window: Place your current page over the previous one and trace through the paper to keep character proportions consistent from frame to frame, a technique known as onion skinning. Without this, drawings tend to drift in size and position.
- Use thin tracing paper for multi-frame sequences: Standard printer paper is often too opaque to see through clearly. Switch to tracing paper or vellum for anything longer than a simple flipbook.
- Control spacing to control speed: Space your drawings further apart to speed up a movement, and closer together to slow it down, rather than changing how quickly you flip the pages. This single principle is what separates natural-looking motion from stiff, robotic movement.
2. Paper Cut-Out Stop Motion
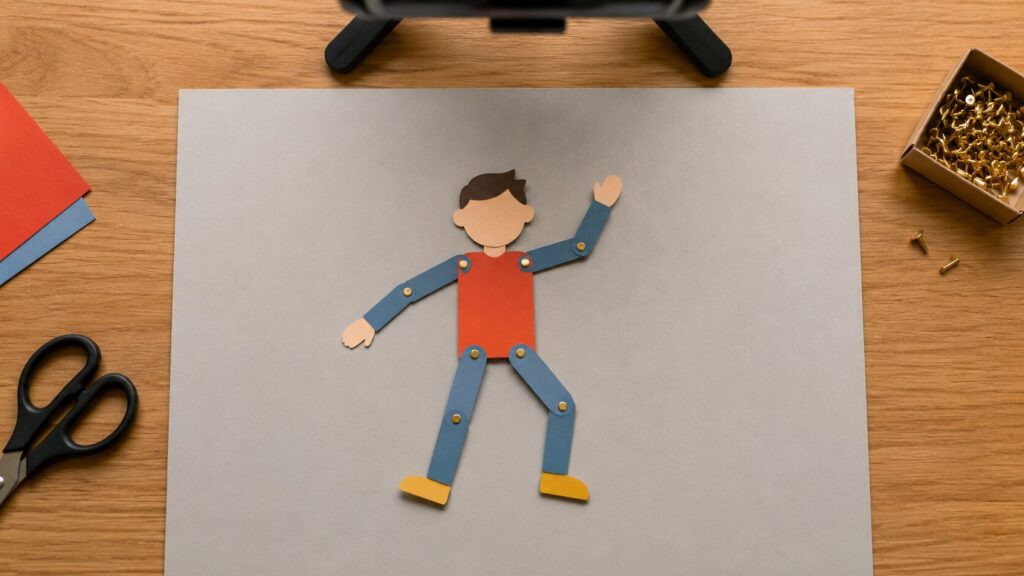
While flipbooks and hand-drawn paper animation rely on redrawing each frame, paper cut-out stop motion is built on physical manipulation, moving articulated paper pieces slightly between each photograph instead.
Start by cutting out your character’s body parts separately, such as the head, torso, arms, and legs. Join them with small brass paper fasteners at the joints. This lets each piece pivot independently.
Mount your camera or phone on a tripod directly above or in front of a fixed background, since even slight camera movement between shots will make the final footage shake noticeably.
Move one limb a small amount, then take a photograph. Move it again before the next shot. Aim for twelve to twenty-four photographs per second of final footage. Keep your lighting consistent throughout, since shifting daylight between shots causes visible flickering once combined.
These hands-on techniques teach the fundamentals of visual pacing before you ever touch a screen. If you’d like to build on that foundation, our academic film programs take these skills further.
Production Option B: How to Make an Animation Video Digitally
Paper methods can feel labour-intensive once you’re working past a few seconds of footage. Digital animation moves that same process onto a screen instead. Software lets you draw, rig, or render every frame.
Here’s how to bring your animation to life using digital tools.
Selecting Your Animation Software
Choosing software depends on which style you’re pursuing and how much you’re willing to spend, since options range from completely free to subscription-based professional tools.
Here are some of the most popular programs used by animators today:
- Adobe Animate: If cartoon-style 2D work is your goal, Adobe Animate is the industry standard for traditional vector animation, widely used in professional cartoon and explainer video production.
- Stop Motion Studio: Continuing from paper cut-out work? Stop Motion Studio is a mobile-friendly app built specifically for capturing physical, frame-by-frame setups.
- Blender: Free and open-source, Blender handles 3D modelling, rigging, and rendering at a professional standard, without any licence fee.
- Unreal Engine: Modern game and film pipelines increasingly rely on Unreal Engine, a free, powerful platform for real-time 3D animation and virtual staging.
Digitizing and Capturing Your Work
If you’ve drawn your animation on paper and want to bring it into software, you’ll either import your hand-drawn sheets as scanned images or capture live footage frame-by-frame through your software’s camera feed, depending on which style you’re working in.
Here’s how to get clean, usable results either way.
- Scan or photograph paper drawings at consistent settings: Use the same scanner resolution or camera position for every sheet. Aim for at least 300 DPI if scanning. This keeps line weight and framing uniform once imported.
- Mount your camera to avoid shake: Use a tripod or a fixed mount rather than handholding your phone or camera, since even small movements between frames will make finished footage visibly jitter.
- Control your lighting to prevent flickering: Keep lighting consistent throughout a shoot. Avoid fluorescent bulbs or shifting daylight. Both can cause visible flicker once frames are combined into video.
- Shoot “on twos” for a natural, hand-drawn feel: Capture twelve unique frames per second rather than a full twenty-four, then hold each frame for two frames of playback. This is standard practice in traditional 2D animation and saves significant drawing time without looking choppy.
If you’re working with a limited budget, you don’t need paid software to get started. Pencil2D and Krita are both free, fully capable 2D animation tools, while Blender remains the strongest free option for 3D work, all of which are used professionally despite costing nothing.
Post-Production: Editing, Sound, and Exporting
Now that you’ve finished animating your frames, whether on paper or on screen, the final stage is where sound, editing, and export settings turn your footage into a polished, shareable film.
Here’s what you need to get right before calling your project complete.
Sound Design and Foley Artistry
Animation without sound is a bit like pizza without cheese, technically complete, but missing the thing that makes it satisfying.
Record Foley for physical actions using real-world materials, such as crumpling paper for fire or tapping coconut shells together for footsteps, a technique used throughout traditional film production.
Layer in a quiet base of ambient sound, like room tone or distant traffic, even for indoor scenes, since complete silence between effects reads as unnatural to viewers.
Add voiceover only where dialogue genuinely matters. Record lines separately in a quiet space and keep them short. Animated dialogue is harder to sync than live-action speech. Sync every sound precisely to its action frame, such as a footstep landing exactly as the foot touches the ground, since even a few frames of mismatch is noticeable.
Editing and Video Export Settings
After you’ve added sound and Foley to your footage, the final step is exporting your film in a format that plays smoothly anywhere it’s shared.
Export as an MP4 file using the H.264 codec. This offers the best balance of quality and file size for platforms like YouTube or Vimeo.
For most beginner projects, export at 1080p resolution (1920×1080) and either 24 or 30 frames per second, matching whatever frame rate you shot on to avoid choppy playback. Always render a short test clip first to check for sync issues before exporting the full film.
From your first sketch to the final sound mix, mastering post-production is what turns a simple idea into a finished film. Learn the complete production pipeline from industry experts at our film school summer programs.
FAQs
Is Animation Easy Or Hard?
Animation is accessible to beginners but takes real time to master, much like learning an instrument. The basic principles, such as spacing, timing, and storyboarding, are straightforward to pick up within a few practice sessions.
What takes longer is developing consistency, smooth movement, and your own style. Starting with simple techniques like flipbooks or short paper cut-out scenes is the easiest way to build confidence before moving on to more demanding digital or 3D work.
Do I Need To Be Good At Drawing To Animate?
No, strong drawing skills help but aren’t required to start animating. Stop motion and cut-out animation rely on physical objects rather than illustration, and many free digital tools include templates and pre-made assets for those less confident with a pencil.
Drawing ability matters more for 2D hand-drawn animation specifically. If storytelling and movement interest you more than illustration, stop motion or 3D animation let you build strong projects.
Can I Animate On My Phone?
Yes, a smartphone is enough to create both stop motion and hand-drawn digital animation. Apps like Stop Motion Studio are designed specifically for phone-based frame-by-frame capture, while apps such as FlipaClip allow hand-drawn 2D animation directly on a touchscreen.
A phone can also photograph paper cut-out or flipbook sequences for digitising later. While a phone won’t replace professional software for complex 3D work, it’s a genuinely capable starting point for beginner projects.
Do Animation Studios Prefer 2D Or 3D Skills?
Most studios value both skill sets, since demand depends on the specific project and industry sector. Traditional 2D skills remain in demand for television animation, indie games, and stylised feature films. Meanwhile, 3D skills are essential for major studio features, game development, and visual effects work.
Building foundational skills in one style while gaining basic familiarity with the other, through a structured programme or self-directed practice, gives you more flexibility when applying for roles or university courses later.
Is Animation A Risky Career?
Like many creative industries, animation carries some career uncertainty, particularly around freelance or contract-based work. However, demand remains strong across film, television, gaming, and advertising.
Building a strong portfolio, gaining practical production experience, and developing both technical and storytelling skills significantly improves job stability and opportunities. Students who combine animation study with business, marketing, or technical skills often find more resilient career paths.
Will AI Replace Animators?
AI is changing parts of the animation workflow, particularly in-betweening, rough automation, and some background generation, but it hasn’t replaced the creative and technical judgement animators provide.
Storytelling, character design, direction, and artistic decision-making remain distinctly human skills that current AI tools support rather than replace. Animators who understand both traditional craft and emerging digital tools are best positioned as the industry evolves.
Conclusion: Bring Your Creative Vision to Life
Every animated film, from a fifteen-page flipbook to a fully rendered digital short, follows the same foundation: a clear idea, careful planning, and patient execution.
Whichever method you choose, animation always rewards those who understand how each frame builds on the last, and knowing that patience will make an early attempt turn into something you’re genuinely proud of.
Your first project won’t be perfect, and it doesn’t need to be. Every animator you admire started exactly where you are now. The fastest way to grow past those first attempts is with real feedback, real tools, and real mentorship.
Ready to take your storytelling further? Join Immerse Education’s Film & Animation Summer School and turn your first sketches into a portfolio-ready film alongside industry professionals and fellow creatives.